The Knowledge Pool — Mayael the Anima Part 2
Hi everyone! Welcome back to The Knowledge Pool, and part 2 of our series on Mayael the Anima. If you haven't yet read part 1, I highly encourage that you do so in order to make the most out of this article. Part 1 can be found here. To quickly recap, my previous article suggested an outline for approaching a Mayael the Anima deck that focuses heavily on the commander as our win condition. Ultimately, our game plan involves starting early with defense and ramp, followed by establishing utility spells, and finally dropping threats to win.
This week I will be going over the card selection process I used when designing my deck list. I got a lot of great feedback about structuring future installments, and I will be working towards merging the theory and card selection elements moving forward. I also got a lot of great card suggestions, and I'm curious to see what gets recommended to me after you all have the chance to read my explanations for my current list.
I left off the previous article with a deck list, and to refresh your memory, here is the list that I proposed:
Selecting the 99
Mayael Targets
Given our chosen end gameplan and our decision to focus on Mayael's ability, I believe our best starting point is figuring out which large creatures are the best investments. As I outlined previously, I believe our creatures must offer us value immediately through ETB abilities, combat triggered abilities, or else must be able to protect themselves in some way. While there are a bevy of options for this category, the following are the creatures that I've found to be most impactful and have earned their place in the deck as a result.
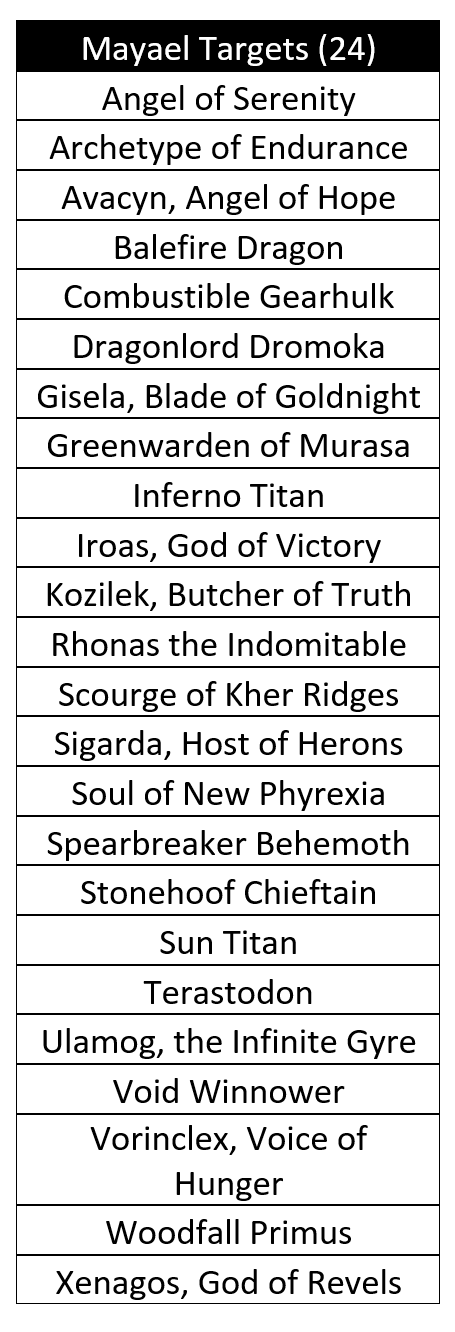
We can then sort our targets into several groups that will help us to define their function in the deck:
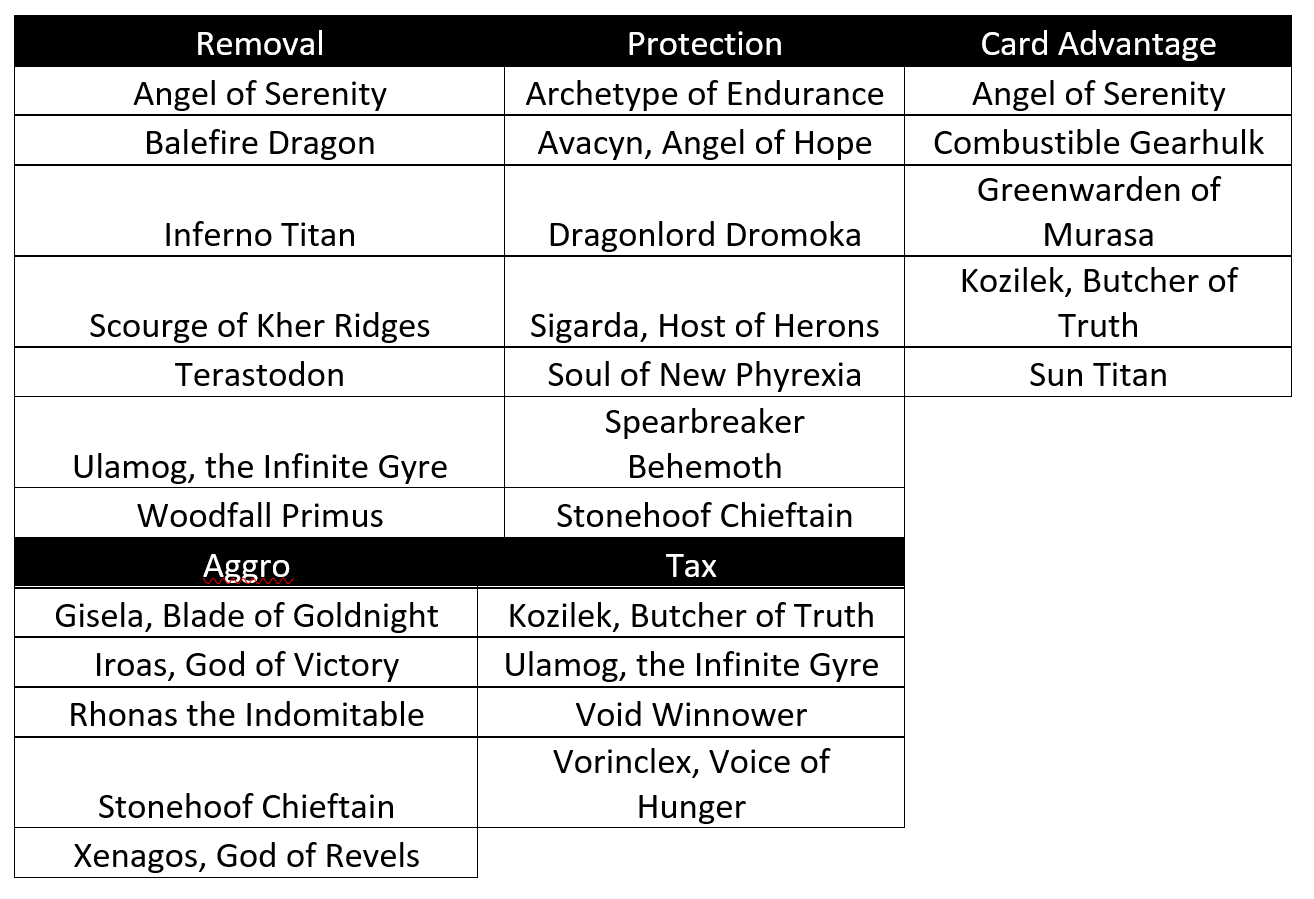
Now that we've categorized our Mayael targets, the reasons for their selection should become more apparent. I want to address how I arrived at this final list, and some of its subtle characteristics:
There are only 24 targets. If we look back at the probability table, we see that this number puts us at roughly a 76% chance of success with each activation of our commander. In other words, we should be successful in finding at least 1 creature every 3 out of 4 activations. This percentage may not be high enough for many people, however I've found it to be sufficient when we build in card selection options with our utility cards. Moreover, increasing our number of targets to 30 offers us just less than a 10% increase in success rate, while depriving us of valuable card slots important for establishing our early game and mid game. This is a fine line every Mayael deck walks. We can have a really high chance of success with each activation, and risk the development that allows us to successfully play Mayael, or else we can play too few creatures and too frequently return nothing on our Mayael investment. With my build, I'm aiming for the mid-line between these two approaches, with a success rate that doesn't entirely sacrifice our ability to play without her.
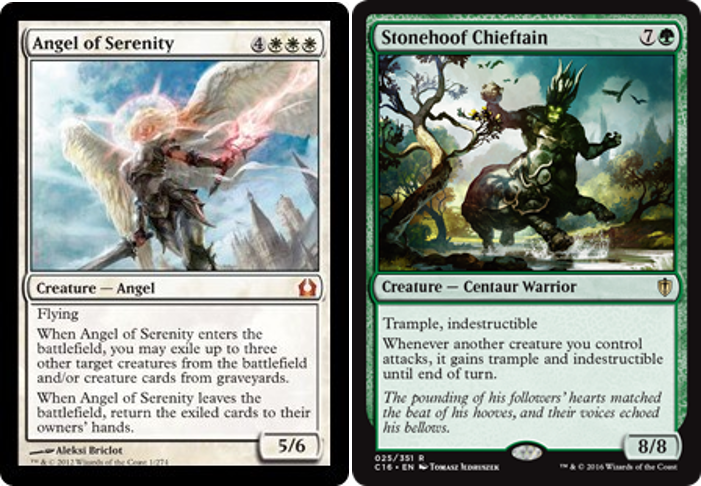
When we divide up our creatures into categories, we notice that we're also filling in several of the categories outlined in our gameplan section. One of the beautiful parts about playing massive creatures is that they tend to come with a wide range of abilities that allow them to be effective on multiple axes. If we draw an Angel of Serenity, for instance, we're not just stuck with a big creature in hand, we now have several options: we can exile problem creatures our opponents control, we can choose our own creatures in the graveyard to act as a form of recursion, or we can do a combination of these actions making her an unfavorable removal target for opponents who now risk us replacing our angel.
Several of these creatures fall into multiple categories as well. For example, Stonehoof Chieftain protects himself and has the potential to protect our other creatures, fulfilling the prerequisite we set for creature selection in this deck. Chieftain also helps us to answer the question: how do we ensure that we can push damage through if the battlefield becomes clogged? Chieftain offers our large creatures a form of pseudo-evasion that will allow us to make use of our likely size advantage in ending the game.
Approaching our creature selection with utility in mind will help us towards our goal of consistency. It will help ensure that our creatures are a more effective back-up plan if Mayael is lost, and it will make them more valuable to us as a form of interaction with our opponents.
Many of the creatures I've selected here are rather self-explanatory, and in most cases, have been chosen to fit these categories. However, I want to provide some explanation behind a handful of creatures presented here, as many of them are particularly good as a result of subtle factors.
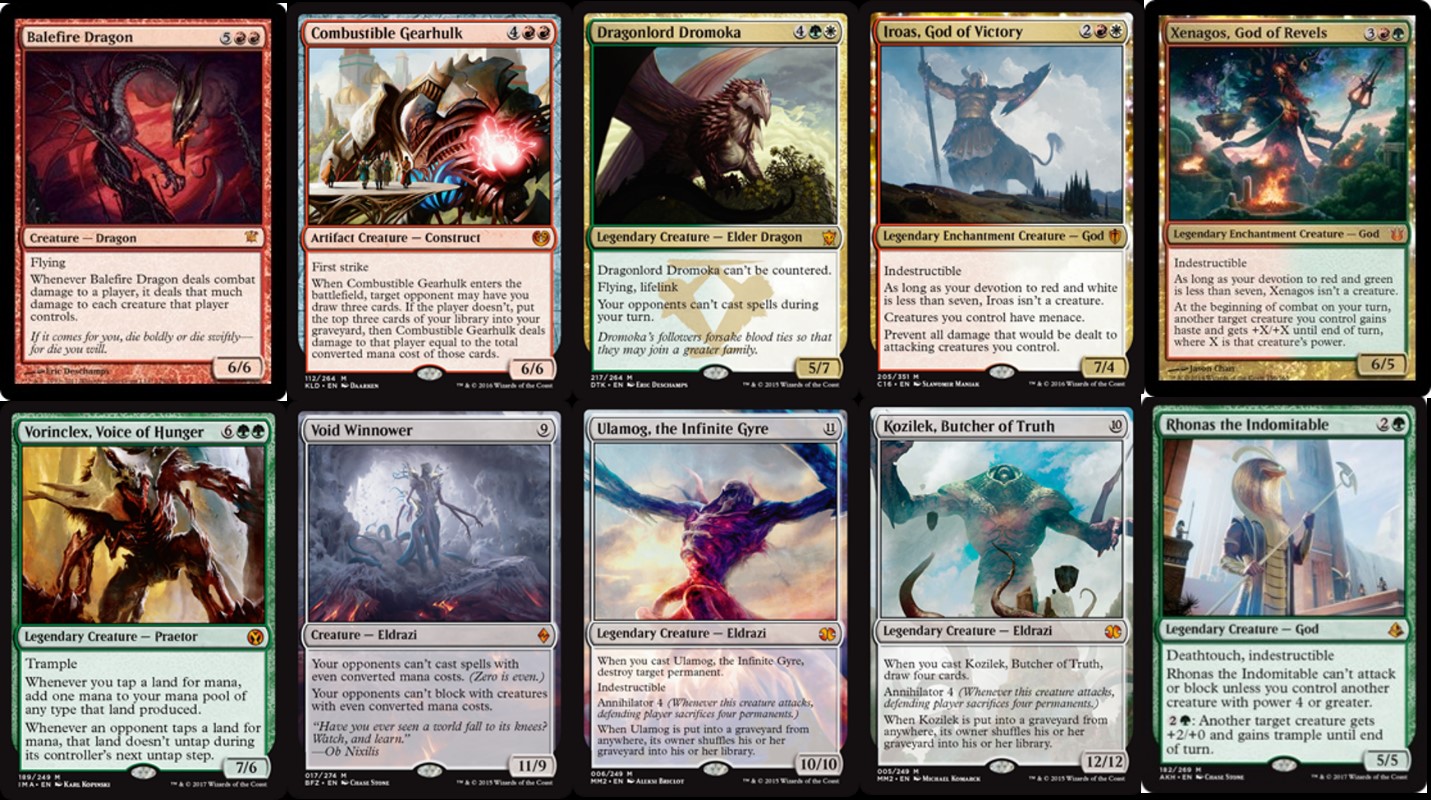
Balefire Dragon, while an obvious choice as indicated by its +27% synergy rating on EDHREC, is particularly potent as a result of its interaction with Mayael. She allows us to play our dragon at the end of an opponent's turn, which will likely give us the opportunity to force through damage with impunity. In this way, Balefire Dragon can be thought of as equivalent to a wrath spell.
Void Winnower and Vorinclex, Voice of Hunger provide us a unique means of protection. While Winnower's ability is fairly random, it ultimately provides an extra barrier for our opponents to overcome in order to stop us. Vorinclex imposes a similar barrier without the randomness, and should he survive until our turn, we will then have a mana boost that can push us towards kill conditions. Both of these cards certainly generate animosity in your direction, and will likely induce removal of some form. However, both put significant pressure on our opponents, especially if we can play them off of Mayael's ability, and their survival will be a choking force that makes the rest of our army more potent.
Dragonlord Dromoka has a somewhat similar effect to Void Winnower, limiting the ways that our army can be dealt with. Ambushing your opponents with Dromoka using Mayael's ability can sometimes provide you the necessary set-up to comfortably attempt an alpha strike.
The gods (Iroas, Rhonas, and Xenagos) all provide us with a potential edge in combat, helping us to solve the issue of a messy board. In addition, all three are among the cheapest Mayael targets in the deck. This is important as it allows them to function as utility spells that we can cast in the early game and mid game. By playing any of these three early on, we've provided ourselves an answer to a gummed-up battlefield once we have Mayael active.
Rhonas is a new addition to the deck, and I've been particularly interested in him given how efficient he is, and how easily this deck can make him a viable creature. Several inclusions we make later reward us for having big creatures, and the fact that Rhonas is natively a creature means that his big body can make him a valuable investment even if he isn't active.
Combustible Gearhulk is another new card that I've been testing recently. Typically, effects that give my opponents options do not make the cut in my lists, and admittedly Gearhulk is largely in my list because it's a personal favorite of mine. This is not to say that the Gearhulk is a bad card, and, in fact, we will usually be able to find somebody at the table willing to let us draw 3 cards. I've also found that Gearhulk can deal a surprising amount of damage, often enough to put a player into the critical range. Despite this, Gearhulk is not fulfilling a critical role in this deck, and if you are looking to replace some of the targets in my list, start here.
Finally, I'm sure many of you have noticed that I've included the Eldrazi titans Ulamog and Kozilek in this list. I would like to make a few clarifications about these cards. First, if you play either of them off a Mayael activation, you will not get their cast trigger ability. We will often be able to cast either titan in the late game thanks to our ramp, however the cast trigger was not the primary reason for the inclusion of the titans. Second, I've grouped both the titans as “Tax”, and the reason for this is the Annihilator ability. I believe that both of the titans are worthy of a spot in this list since they bring so much pressure to the table, especially when put into play during an opponent's turn. Even in the later stages of the game, the Annihilator ability threatens to bury your opponents, setting them back several turns. Annihilator is also the reason why we're playing Ulamog, the Infinite Gyre instead of Ulamog, the Ceaseless Hunger, as the latter's combat triggered ability is far less impactful in the commander format.
Your deck's Mayael targets afford you the greatest flexibility. I've personally found the above options to be successful, but I fully endorse experimentation in this category, with the caveat that you should be aware of the utility of your choices and how your choices will reward your investment into Mayael.
I personally find the top end of the Mayael deck to be a beautiful sight. Very few decks can afford to be play so many massive creatures. However, I imagine that many of you are considering the implication of 24 high cmc spells and becoming concerned. Fear not, we've planned for this, the next step is figuring out our ramp package.
Ramp
While there are a variety of cards that allow for ramping, they all lead us towards the same outcome. With this package I've tried to ensure that we have a density of ramp for both the early game and mid-game.
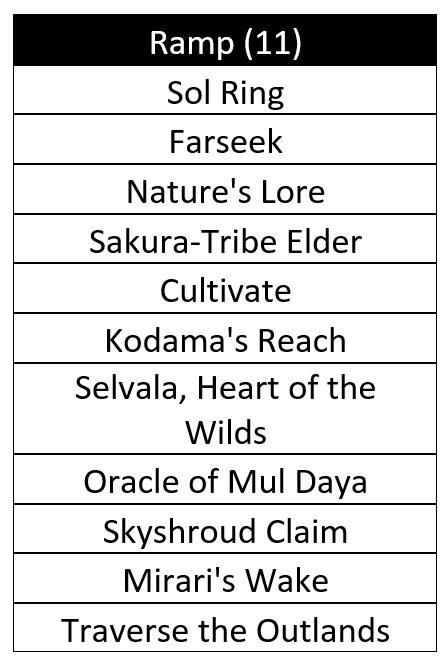
From these selections we have seven options that can be played in turns 1-3, and 4 option that become available to us once we hit turns 4-5. Of our early game options, Farseek and Nature's Lore are included as they will double as fixers, allowing us to hit our dual lands. Sakura-Tribe Elder while working as a ramp spell also falls into the category of “proactive defense” that I've described previously. In many cases we'll want to cash in our Elder quickly if we are relying on the extra land to curve, however if we aren't in a hurry, the extra body can help us to buy some time if an opponent has begun to attack early. Even just the presence of a body on the battlefield can be enough to dissuade our opponents from choosing us as a target.
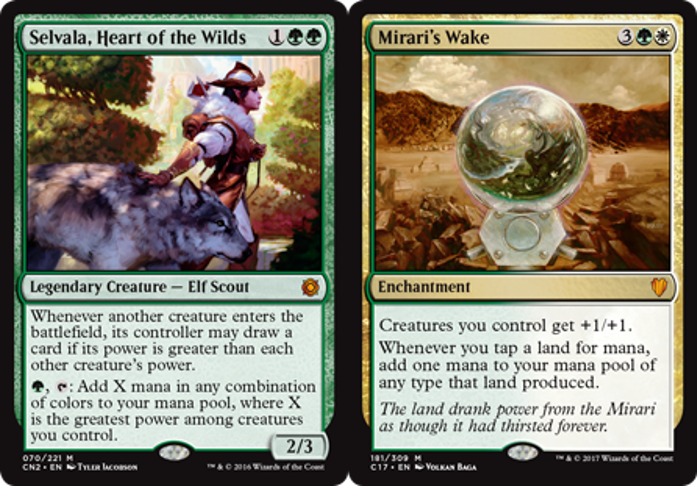
The merits of Cultivateand Kodama's Reach have been outlined by many writers, but I don't believe it can be overstated how well these can set us up moving into the mid-game. Guaranteeing ourselves the extra land drop will ensure that we don't experience a mid-game draught, and we will also be affording ourselves fixing. Selvala, Heart of the Wilds is a relatively new inclusion for my deck. I tend to dislike “dorks” for this deck, as we can't afford to lose our ramp to removal. We will also be running a significant amount of wrath-style removal of our own, and having dorks on the battlefield can cause us to misevaluate the best time to use them. In addition, cheaper dorks like Birds of Paradise are particularly lackluster in this deck since the notion of playing a turn 3 Mayael is rather unattractive. This being said, I feel like the potential upside for Selvala outweighs negatives. In the worst-case scenario, Selvala allows us to filter our mana, while ramping us by 1. If we've played no other ramp, this means we'll have the potential to play a 6 cmc creature on turn 5, and by turn 7 have access to an additional 5 mana. Moreover, while many ramp spells become less effective as the game progresses, a later game Selvala threatens to provide us a significant boost in output from a mana perspective. In this deck I've found that Selvala's draw ability doesn't trigger as much as you would imagine, given that most of our creatures end up around 6 power. But the additional card draw is always welcome, and I'm happy to occasionally get a small bonus from an early game ramp spell.
Oracle of Mul Daya and Skyshroud Claim are safe and consistent options, and should usually give us the boost we need to begin playing our big spells. I like Skyshroud Claim over similar options like Explosive Vegetation because it allows us to find Forest based dual lands, and it allows us to bring our lands into play untapped, effectively cutting the cost of the spell in half. Oracle playing lands from the top of our deck also helps us to improve our chances of successful Mayael activations, and will allow us to make the most of our card selection.
Finally, Mirari's Wake and Traverse the Outlands are included as mid-game options intended to firmly push us in the direction of endgame. Mirari's Wake is the cheapest non-symmetrical mana doubling option we have access to, while Traverse falls into a similar category as Selvala. In this deck, Traverse does not have the same early game upside that Selvala provides, however if we play it later game it will provide us a more permanent source of ramp that will ensure that we have the mana we need.
I've mentioned that I don't like dorks in Mayael, however another omission is probably clear: artifact ramp. Outside of Sol Ring, I've focused this deck towards land ramp, as I believe it to be a more resilient option. Also, our land ramp spells should be at least equally as effective at fixing, and removing lands from our deck will slowly help us to increase our odds of having successful Mayael activations.
When addressing our early game and mid-game, the counterpoint to our ramp package was our defensive package. Now that we've established how we will be accelerating, I want to focus on the elements that will keep us fighting in the game's initial stages.
Defense
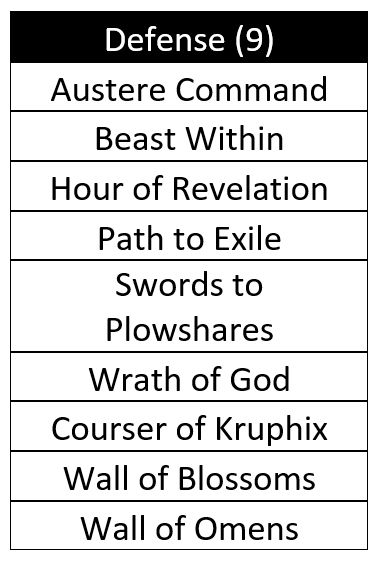
Here are the defensive cards that I've chosen for our deck. Of these, our list can be divided into proactive and reactive options.
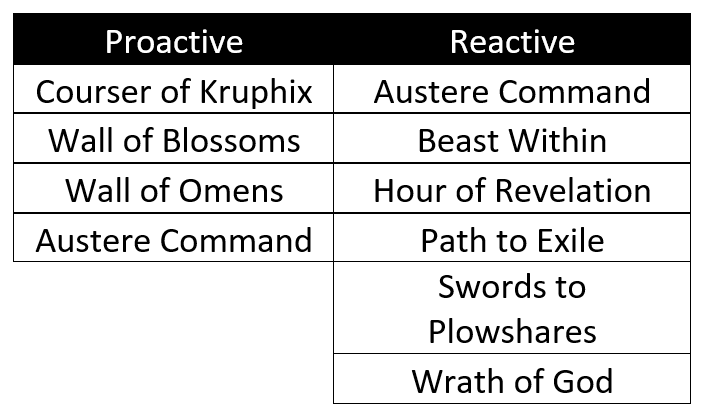
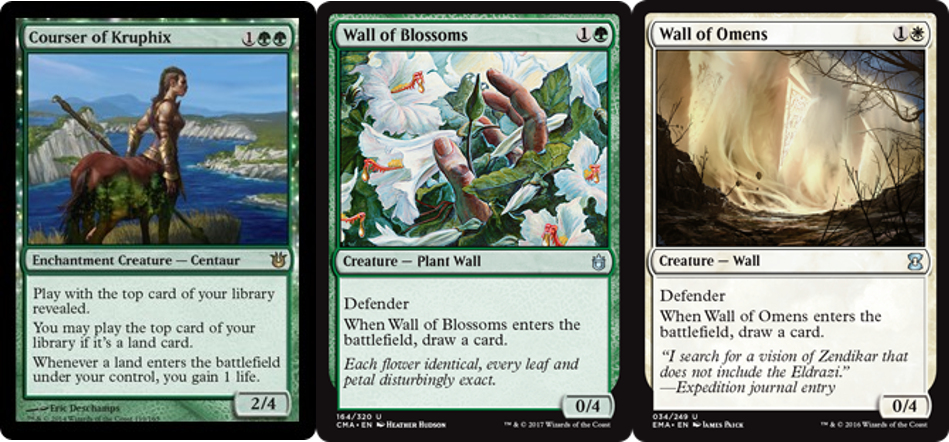
I first want to explore our proactive options. Wall of Blossoms and Wall of Omens may seem like strange inclusions, however the logic we used when evaluated Sakura-Tribe Elder applies here as well. While the walls will not be ramping us, we're investing 2 mana and our turn 2 play into roadblocks to dissuade our opponents from focusing on us. These two walls were selected because they replace themselves, making them less of a dead draw later in the game, while helping us find additional fuel in the early game.
Courser of Kruphix is a pet card of mine, however it serves a real purpose here. Much like Oracle of Mul Daya, Courser is going to act as a form of card selection, removing dead cards from our Mayael activation. This also means Courser can act as a steady form of card advantage that synergizes with the various other forms of top-deck manipulation we have. And like our two walls, Courser will be sturdy on defense.
Moving on to our reactive options, we see several Commander stalwarts: Path to Exile, Swords to Plowshares, Beast Within, and Wrath of God. Many players have an aversion to spot removal in Commander, however I believe some amount of it is essential. We need to have the opportunity to interacts with our opponents in an instant an efficient way if we want to stop certain combos. Past iterations of this deck have also included Chaos Warp and Krosan Grip, and I believe both would make valuable inclusions if you find the need for more instant speed options.
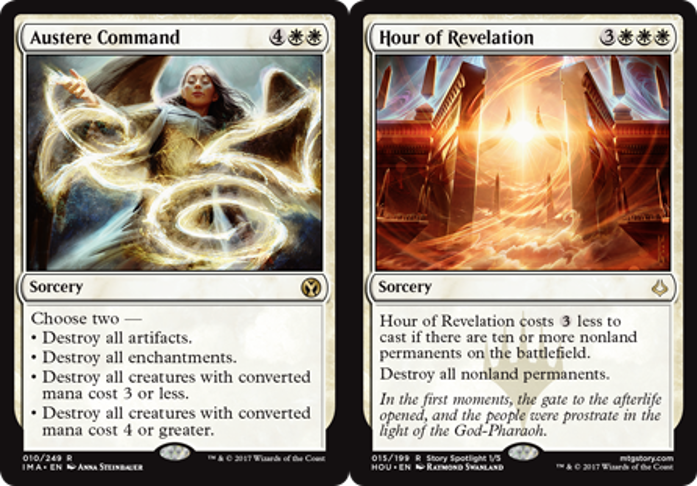
This list is packing three dedicated wrath spells. Wrath of God is simple and straight forward, and is included as a quick stop to our opponents attempting to build up a board too quickly. Hour of Revelation is a new inclusion in the deck because of its cost-effective nature.
Finally, Austere Command is listed as both proactive and reactive. If we are casting command to kill all creatures, odds are that we're in a bad spot. Most of the time we will be destroying small creatures that are in the way of our big creatures, or targeting artifacts or enchantments that are causing us problems. This is one instance where modality is invaluable, and we will almost always come out ahead of our opponents after casting this spell.
Before I move forward, I want to revisit the list of the creatures listed as “removal” under our Mayael targets section. While those creatures can't be classified as defensive, they do provide us additional options for getting rid of troublesome permanents. If you were to combine both these categories into one greater “removal” category, it would look like this:
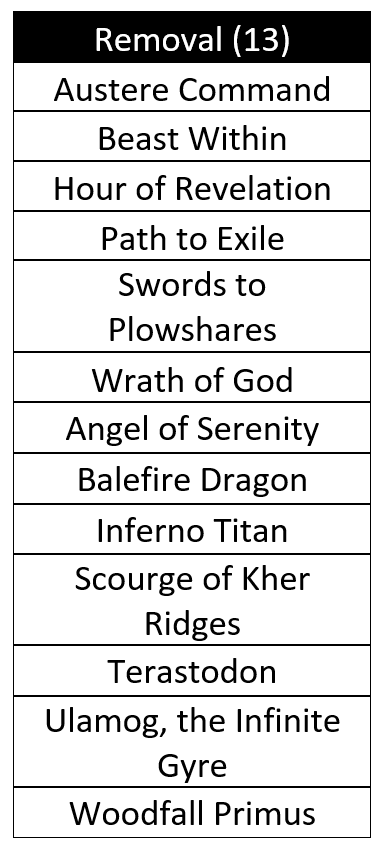
Now that we can see all our removal in one place, I want to point out another function of these cards I've selected: modality. I mentioned this concept when describing Austere Command, however choosing the cards that have a greater breadth of targets that ensures we have a decent chance to answer as many unique situations as possible. Let's breakdown this removal into: creature removal, enchantment removal, artifact removal, and land removal.
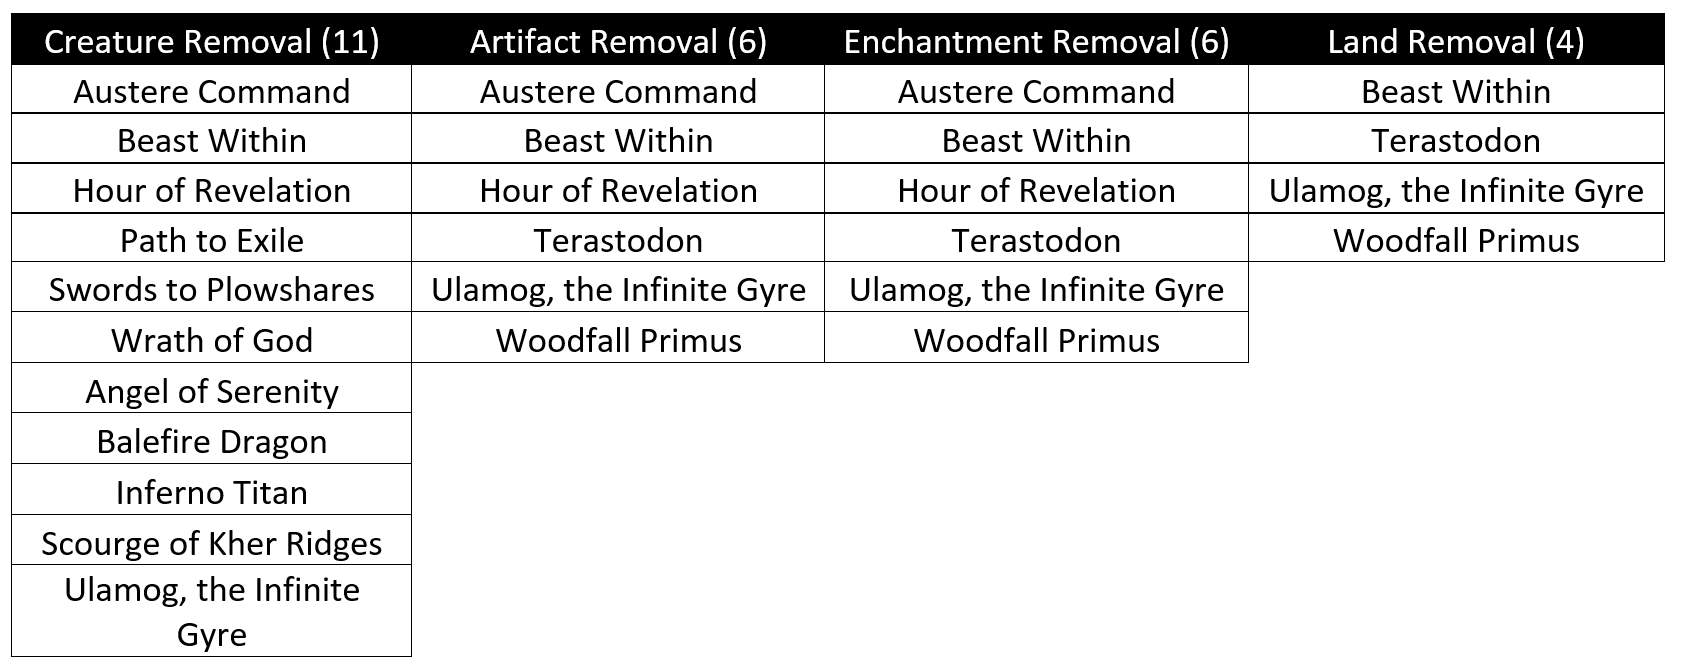
Looking at our cards in this way, we can see that even though we've only devoted 13 total slots to removal, we've included options such that we have at least 6 options each for hitting nonland, non-walker permanents, and at least 4 options each for killing Planeswalkers and lands. This diverse spread is possible because our removal spells were selected with modality in mind, with the following hitting more than 1 type of permanent: Austere Command, Beast Within, Hour of Revelation, Terastodon, Ulamog, the Infinite Gyre, and Woodfall Primus. Keeping active lists of what types of permanents your removal hits will prevent your decks from being designed with clear weaknesses to specific card types.
The final two categories we incorporated into our game design are utility and protection. A lot of our protection elements were covered by the selection of Mayael targets that include protective abilities. As such, I believe we can merge the utility and protection section, as our remaining protection options also have utility function.
Utility/Protection
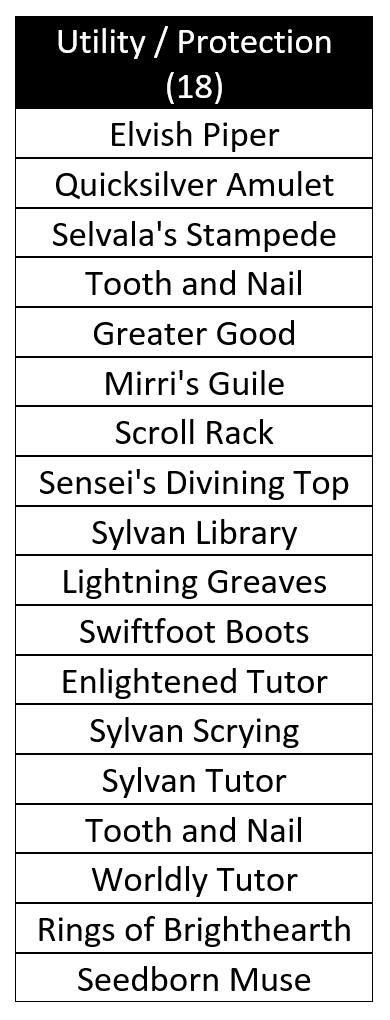
With a brief glance at our utility selections, a general theme is difficult to pinpoint. I believe it will be more constructive to us if we breakdown these options so that we can see how they're contributing to our strategy.
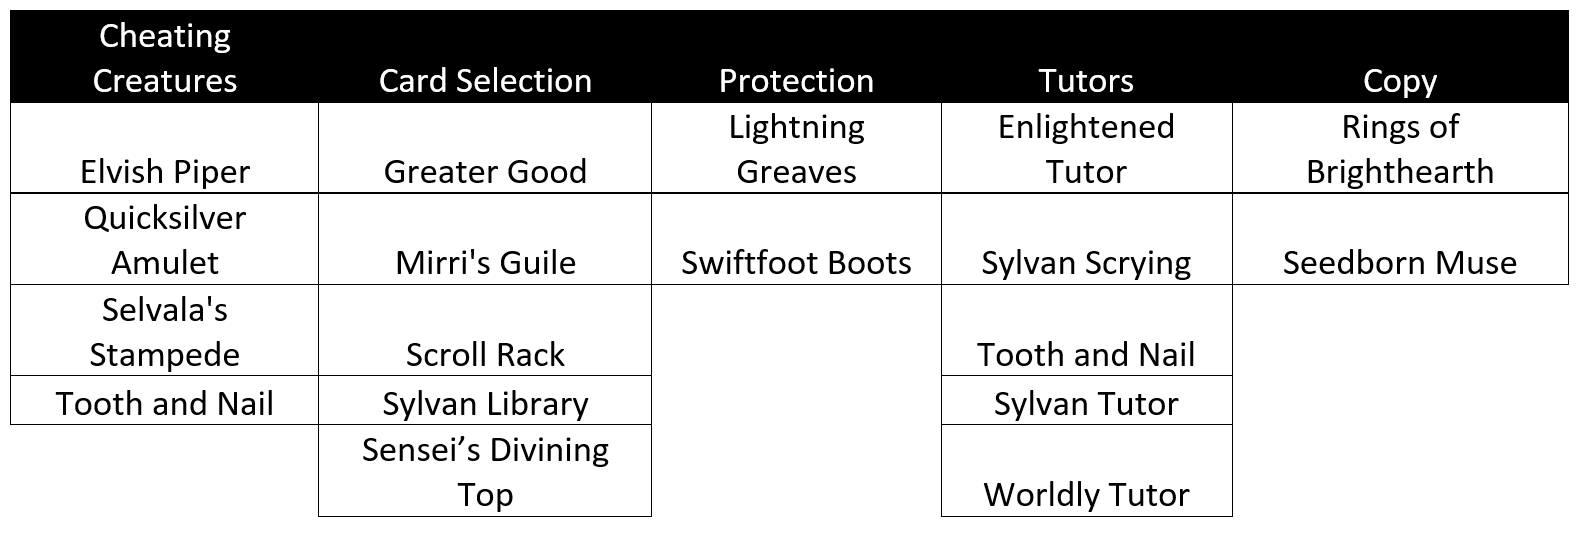
Let's first start with “Cheating Creatures”. Back when we were defining our game plan, I mentioned how important it is to have additional options for when we lose Mayael. Elvish Piper andQuicksilver Amulet attempt to give us cost effective ways of getting our creatures into play, and doing so at instant speed while invalidating counterspells. Selvala's Stampede is similar to a Mayael activation with a higher ceiling, and is primarily in the deck to provide us an army out of nowhere. Finally, most players are familiar with Tooth and Nail. This deck omits the potential two card combos this card enables, but you're welcome to include them. With this build, Tooth and Nail is primarily intended as a means of finding missing pieces to our kill condition.
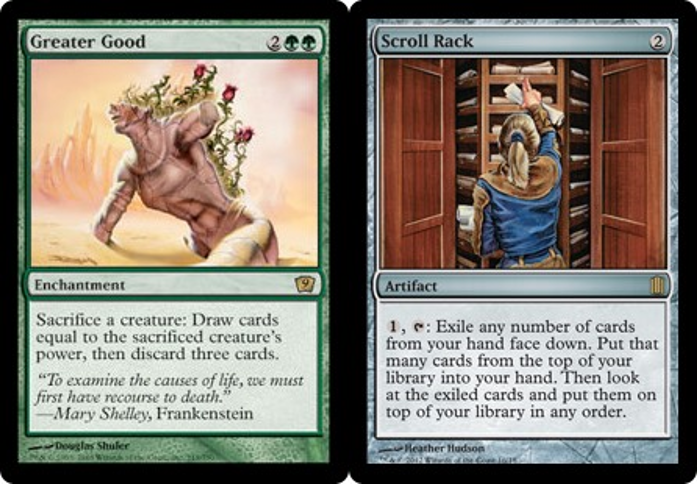
Card selection is the missing piece that helps to make this deck consistent. I've mentioned how we've tried to select an ideal number of Mayael targets, and how we've selected our ramp such that we are removing dead cards from our Mayael activations. These card selection options were chosen with the same intentions, and help to guarantee our success with Mayael. Mirri's Guile, Sylvan Library, and Sensei's Divining Topcan all be played early, and help us filter towards the cards that will help at each stage of the game. If we need to hit our land drops, or remove a problem permanent, these three will help us do so. Once we have Mayael on board, these three will help us set-up our draws such that we're leaving potential targets on top of the deck. Scroll Rack has a similar effect, and for our deck works like a reusable Brainstorm. The obvious interaction is to take a Mayael target from our hand, put it on top of our library, and then put it into play with Mayael. However, we can also get a greater use from Scroll Rack by putting back any other cards we don't need, and shuffling them away with our Mayael activation. This will help us protect our best cards from discard effects, while also digging us towards cards more applicable to our current stage of the game.
Greater Good falls into both the categories of protection and selection. While it doesn't allow us to manipulate the top of our deck, it will allow us to turn any of our Mayael targets into hefty card draw. Sacrificing a few of our big creatures can sometimes be enough to dig us into the pieces that will win us the game. The reason I also consider Greater Good to be a protection spell is that it's a free sacrifice outlet, that will prevent our creatures from being stolen or exiled. In comparison to either of these scenarios, it's almost always better to have our creatures in the graveyard.
Our remaining protection spells are Lightining Greaves and Swiftfoot Boots. Both of these offer us a cheap means of protecting Mayael and her targets when we play them, while also giving them haste.
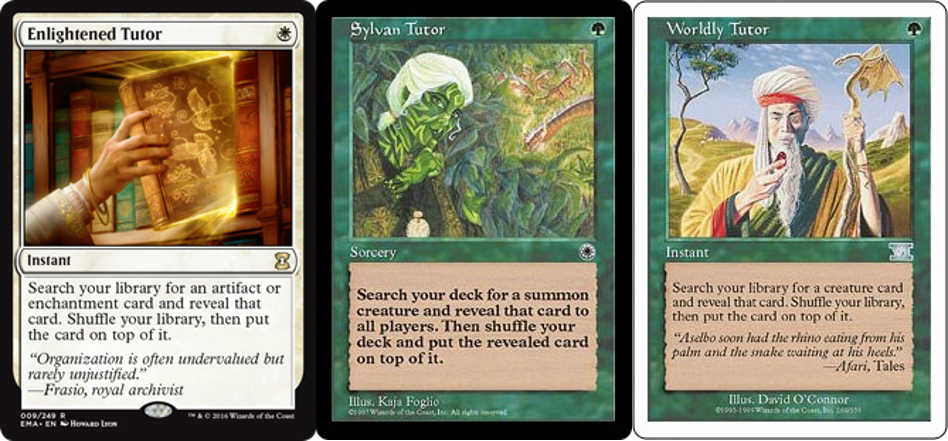
I've found Tutors to be a polarizing subject in the greater commander community. However, there are synergistic reasons for the ones I've included. Enlightened Tutor, Worldly Tutor, and Sylvan Tutor each give us the ability to directly select the next Mayael target we would like to put into play. By playing any of these three before activating Mayael, we will be able to stack our deck with exactly what we need to move us towards ending the game. Worldly Tutor and Sylvan Tutor will each give us that option to select any Mayael targets we want, while Enlightened Tutor allows us to select from: Iroas, Xenagos, Gearhulk, and Soul of New Phyrexia.Enlightened Tutor is also useful for finding usGreater Goodor Scroll Rack. Sylvan Scryingdoesn't boast a potent synergy with Mayael, however it represents every utility land we choose to include in the deck, and in the worst-case scenario will help us to fix our mana and hit our land drops.
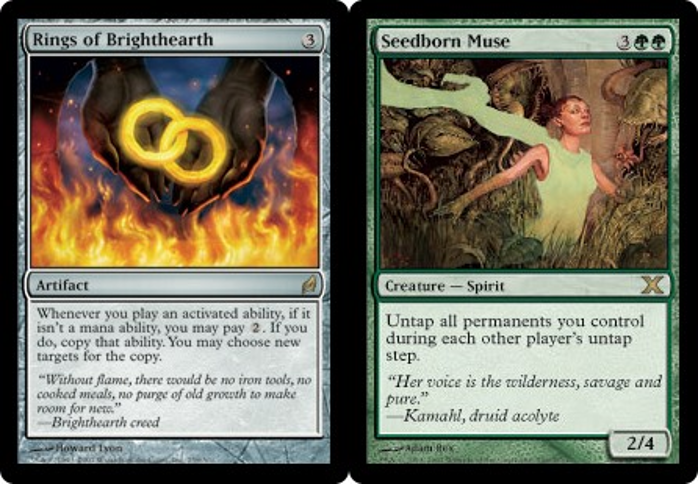
The final two non-land cards fill a unique role in the deck: enhancing our potency. Rings of Brighthearth is primarily in this deck for its interaction with Mayael's ability, although it also works with Quicksilver Amulet and Elvish Piper. Seedborn Muse offers a similar utility, but allows us the luxury of activating Mayael on each of our opponent's turns. Muse also offers us a lot more mana to play with, and will give us the chance to activate Scourge of Kher Ridges or Soul of New Phyrexian multiple turns in a row.
Bringing It All Together
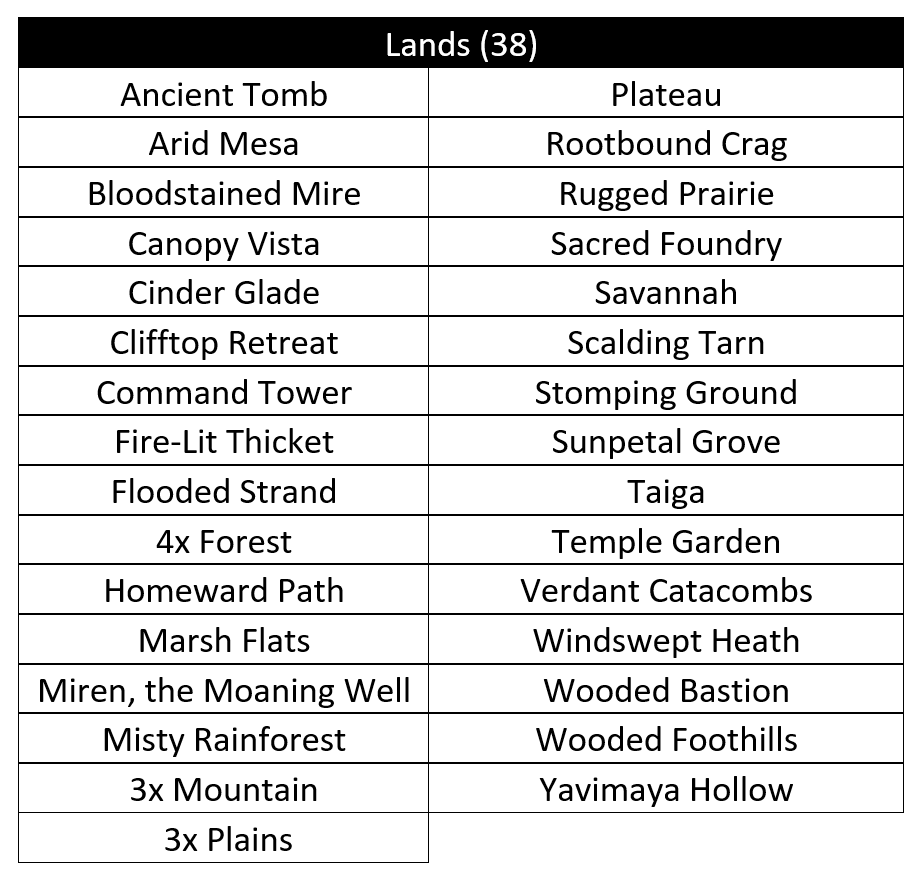
We now know how we want our deck to play out and how we've selected our cards to best fulfill our game plan. The only remaining card selections are lands, and I believe this area is rather variable. For our Mayael deck, the key is focusing our efforts on fixing. Since we are so heavily focused on the end game, and since so many of our cards are high cmc with diverse mana costs, we need to be sure we're hitting our land drops every turn, and giving ourselves the best chance to cast our spells. I opt for 38 lands for consistency's sake. I also aim for 3-4 utility lands so that we can keep an emphasis on fixing. A few of the ones that I prefer are: Ancient Tomb, Homeward Path, Miren, the Moaning Well, and Yavimaya Hollow. Each of these fills in a category we've previously mentioned. Tomb helps this deck ramp, while Homeward Path and Miren, the Moaning Well act as protection in a similar way as Greater Good. Yavimaya Hollow gives us a direct way to keep Mayael alive without having to invest in additional utility card slot.
I encourage anyone that does pick up this deck to approach games with a defensive mindset. Try not to overextend, and let other players be the aggressors through the mid-game. Build up your board state, and lay low until the first few majors battles are over. From my experience, it's most effective to begin presenting our threats once the initial dust has begun to settle. Ultimately, each group is different, and will require different degrees of aggressiveness to navigate successfully.
Even if I have not peaked your interest in Mayael, I hope you've found the core deck building concepts useful. In future articles I will be applying these concepts to other Commanders and other decks to show how I would approach the deck building process. When we boil it down, however the process is the same: establishing our goals and establishing how we're going to reach those goals. Until next time, I wish you all the best, and happy brewing.
Your opinions are welcome. We love hearing what you think about Magic! We ask that you are always respectful when commenting. Please keep in mind how your comments could be interpreted by others. Personal attacks on our writers or other commenters will not be tolerated. Your comments may be removed if your language could be interpreted as aggressive or disrespectful. You may also be banned from writing further comments.
